|
In order to attach a prop to a clip with a locator, you need to right-click into
a prop track, and select from the context menu.
The attachment clip will show up red since it is not attached to anything just yet.
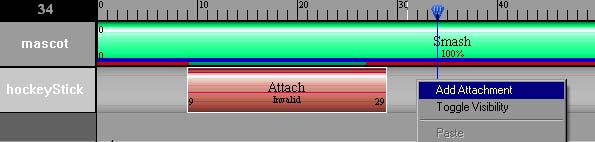
Adding an attachment clip
Double-click the newly created Attachment Clip to view its properties.
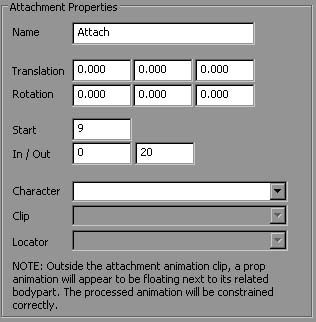
An attachment clip's properties
In the lower section of the attachment clip's property page, you will find three drop lists.
The first field is used to select the desired character to which this prop will be attached.
The second field is used to select the clip which contains the desired animation locator.
The last field is used to select the animated prop locator of the selected clip.
Attachment clips have a global offset so you can properly place the prop
with the chosen character. This offset is kept for the whole time of the attachment clip's duration.
When all three fields are filled up, the attachment clip will turn blue, and the prop object will move
to the prop locator's location. You can further refine its placement using the usual translation and rotation
manipulators.

A properly attached prop
You can now add other clips with props and blend the attachment clips together in order to
build up the animation of the prop. You can also have attachment clips among multiple characters to exchange the prop
between the characters.
An important concept to understand when using props is that if there is no
attachement clip, the prop will not be animated, but if you make an attachment clip longer that the animated prop locator,
the prop will maintain its relation to the attachment location on the character. This means that if a prop is attached to a hand, it will stay attached
to this hand, even if there are no prop locator at that time in the character clips.
|